Docusaurus利用docker执行爬虫程序完成搜索功能

· 5 min read
Happlay71
一个渴望成为技术大佬的小白

前提

  • 网站由Docusaurus创建
  • 注册了Algolia账户(本文使用Github登录)
  • 创建过数据源

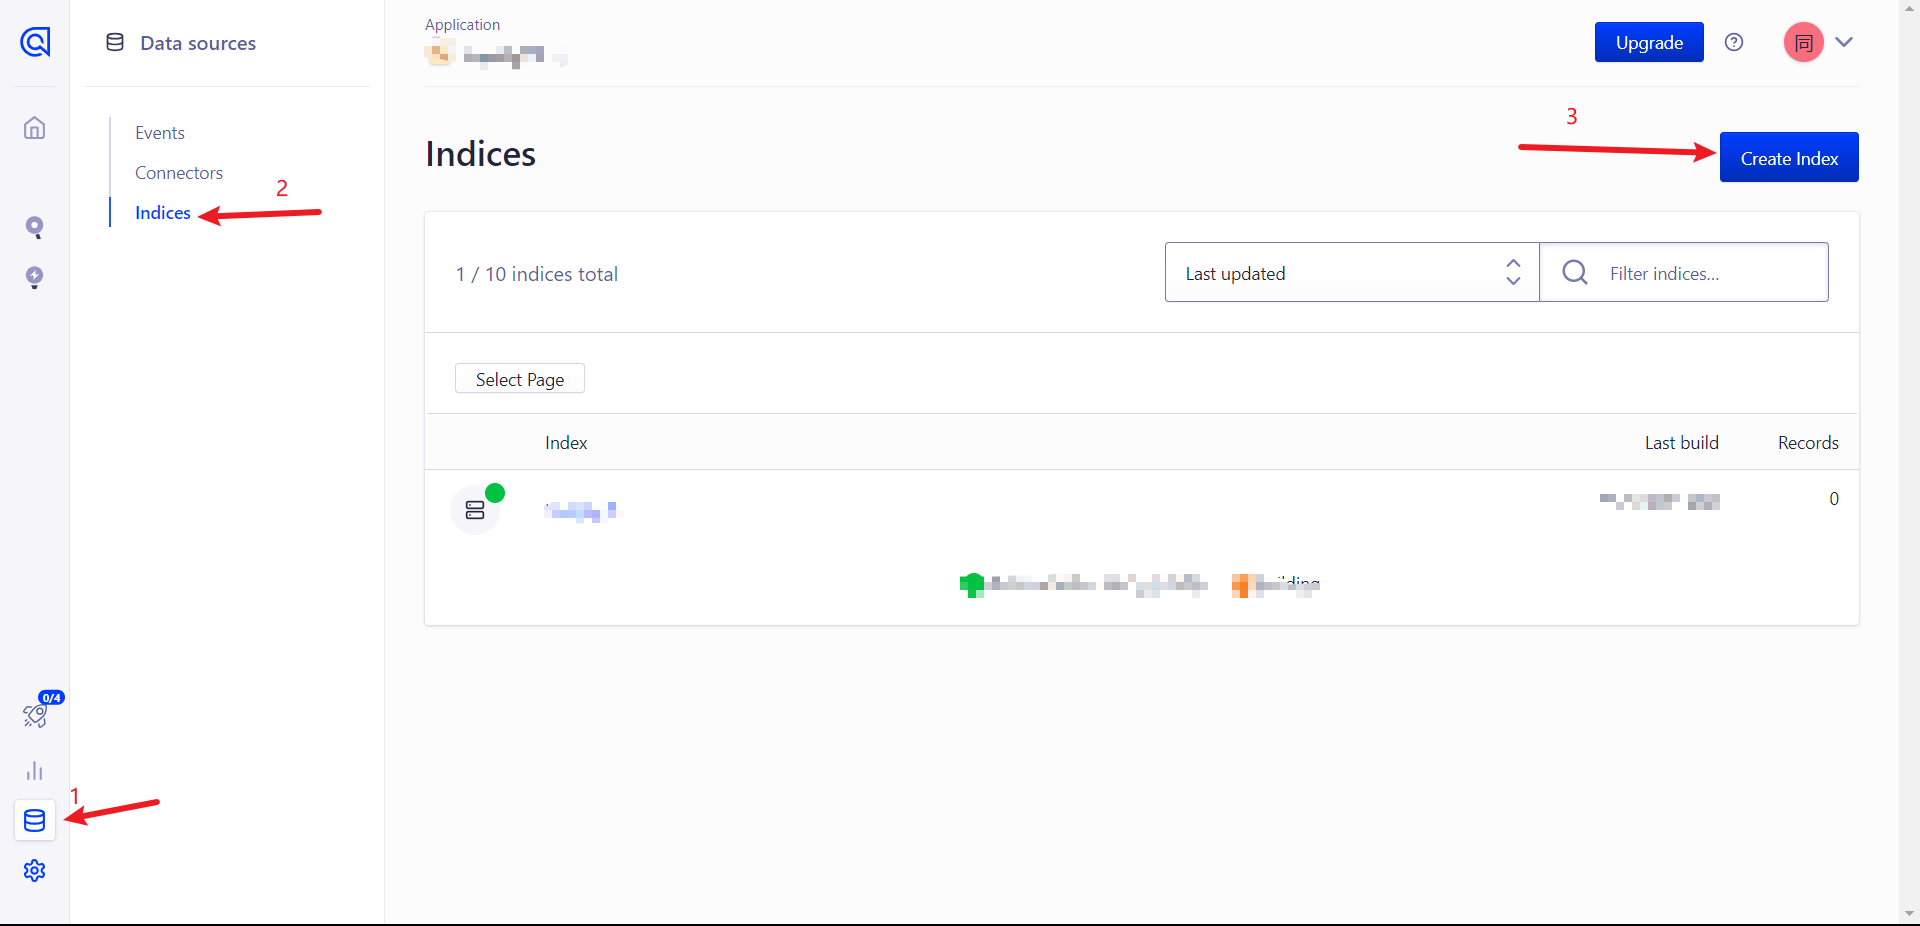
algolia数据源里创建索引

准备好的数据源中

配置algolia

配置docusaurus.config.js


themeConfig: {
// ...
algolia: {
apiKey: "Admin API Key",
indexName: "刚才创建索引的 name,不是数据源的 name",
appId: "Application ID",
},
}

上述三个配置的查询位置
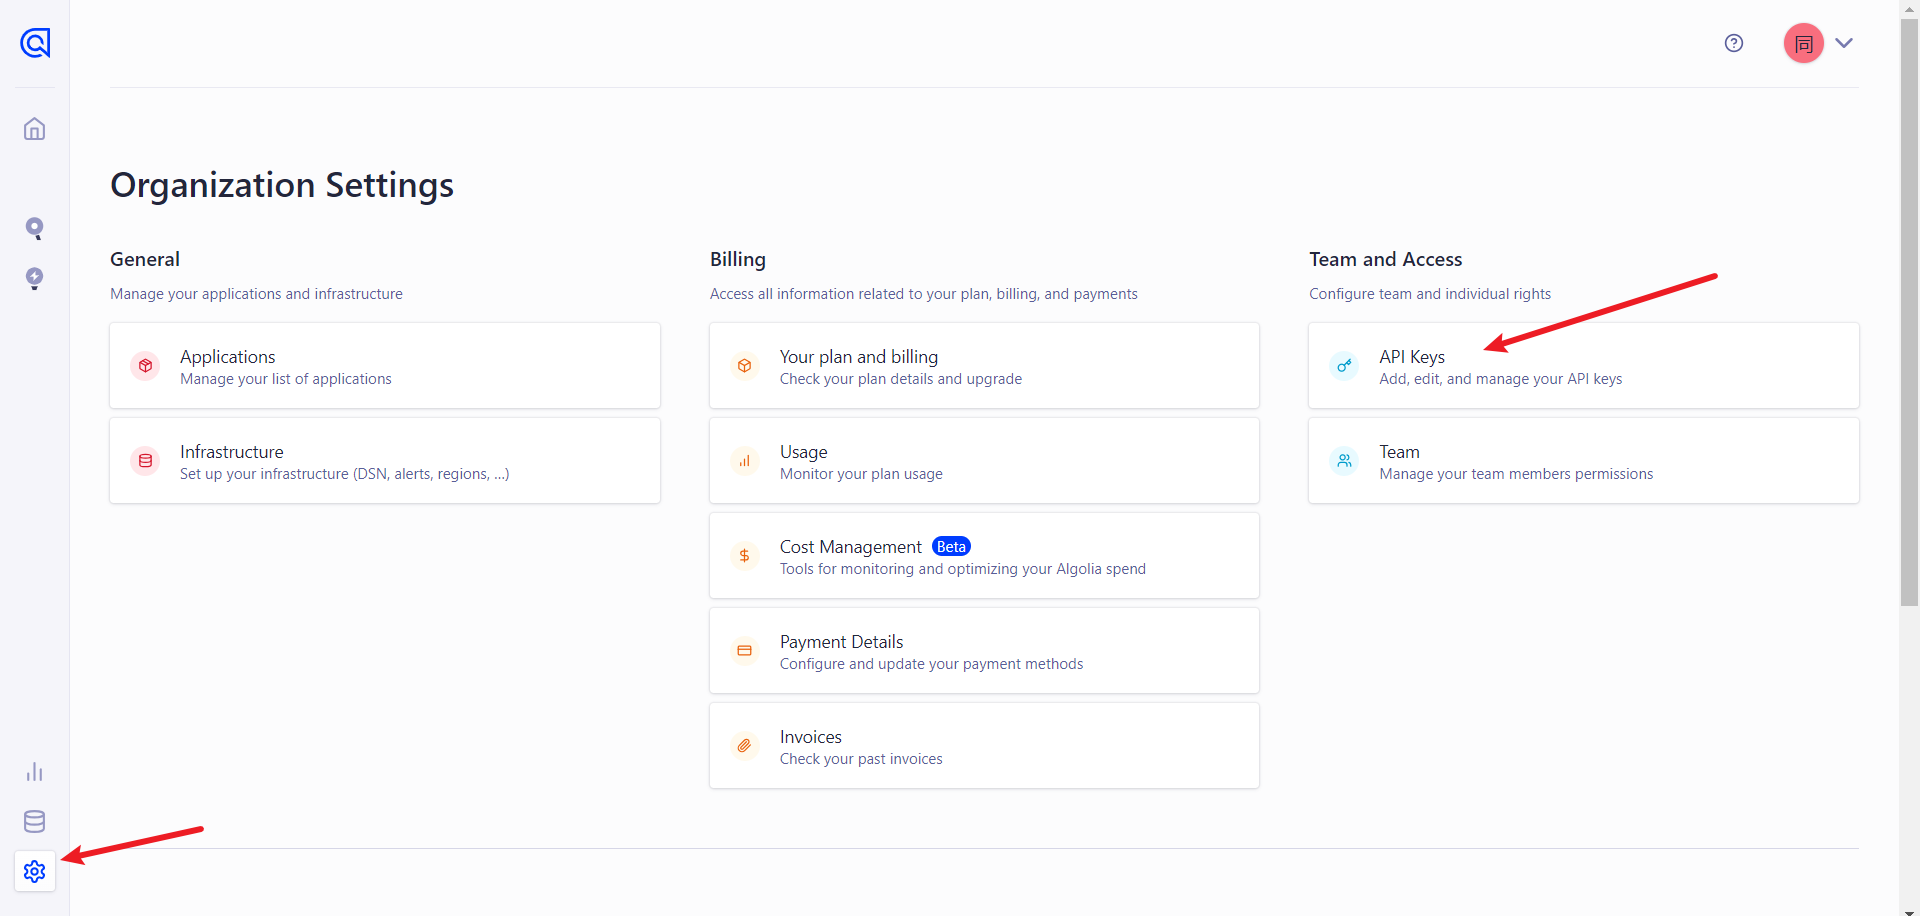
注意:key应具有相应的权限,建议使用Admin API Key

这时就能看到博客的右上角出现了熟悉的搜索框了

接下来我们继续实现它的搜索功能

Docker 爬取本地内容推送到 Algolia

安装jq

在服务器中安装jq用来解析json文件

# 系统:Centos7

yum install -y epel-release && yum install -y jq

完成配置文件

在项目根目录下创建.envdocsearch.json

.env-存放环境变量

ALGOLIA_APP_ID=xxx
ALGOLIA_API_KEY=xxx

docsearch.json

{
// 修改部分
"index_name": "对应上config文件里面的indexName,也是创建的索引名",
"start_urls": ["https://xxx.xxx/"], // 自己的域名网站地址
// 更换自己的域名地址,Docusaurus 官方会有配置生成 sitemap.xml 的方式
"sitemap_urls": ["https://xxx.xxx/sitemap.xml"],
// end
"stop_urls": ["/search"], // 排除不需要爬取页面的路由地址
"selectors": {
"lvl0": {
"selector": "(//ul[contains(@class,'menu__list')]//a[contains(@class, 'menu__link menu__link--sublist menu__link--active')]/text() | //nav[contains(@class, 'navbar')]//a[contains(@class, 'navbar__link--active')]/text())[last()]",
"type": "xpath",
"global": true,
"default_value": "Documentation"
},
"lvl1": "header h1, article h1",
"lvl2": "article h2",
"lvl3": "article h3",
"lvl4": "article h4",
"lvl5": "article h5, article td:first-child",
"lvl6": "article h6",
"text": "article p, article li, article td:last-child"
},
"custom_settings": {
"attributesForFaceting": [
"type",
"lang",
"language",
"version",
"docusaurus_tag"
],
"attributesToRetrieve": [
"hierarchy",
"content",
"anchor",
"url",
"url_without_anchor",
"type"
],
"attributesToHighlight": ["hierarchy", "content"],
"attributesToSnippet": ["content:10"],
"camelCaseAttributes": ["hierarchy", "content"],
"searchableAttributes": [
"unordered(hierarchy.lvl0)",
"unordered(hierarchy.lvl1)",
"unordered(hierarchy.lvl2)",
"unordered(hierarchy.lvl3)",
"unordered(hierarchy.lvl4)",
"unordered(hierarchy.lvl5)",
"unordered(hierarchy.lvl6)",
"content"
],
"distinct": true,
"attributeForDistinct": "url",
"customRanking": [
"desc(weight.pageRank)",
"desc(weight.level)",
"asc(weight.position)"
],
"ranking": [
"words",
"filters",
"typo",
"attribute",
"proximity",
"exact",
"custom"
],
"highlightPreTag": "<span class='algolia-docsearch-suggestion--highlight'>",
"highlightPostTag": "</span>",
"minWordSizefor1Typo": 3,
"minWordSizefor2Typos": 7,
"allowTyposOnNumericTokens": false,
"minProximity": 1,
"ignorePlurals": true,
"advancedSyntax": true,
"attributeCriteriaComputedByMinProximity": true,
"removeWordsIfNoResults": "allOptional",
"separatorsToIndex": "_",
"synonyms": [
["js", "javascript"],
["ts", "typescript"]
]
}
}

服务器配置

在服务器创建固定位置存放.envdocsearch.json 文件

打开该文件,执行

docker run -it --network 网络名称 --env-file=.env -e "CONFIG=$(cat docsearch.json | jq -r tostring)" algolia/docsearch-scraper

服务器出现> DocSearch: https://……时说明正在推送本地爬取的内容到algolia

利用GitHub实现自动化部署

在项目的根目录下找到.github/workflows/docsearch.yml文件(没有则创建一个)

name: docsearch

on:
push:
branches:
- main
jobs:
algolia:
runs-on: ubuntu-latest
steps:
- uses: actions/checkout@v2

- name: Get the content of docsearch.json as config
id: algolia_config
run: echo "::set-output name=config::$(cat docsearch.json | jq -r tostring)"

- name: Run algolia/docsearch-scraper image
env:
ALGOLIA_APP_ID: ${{ secrets.ALGOLIA_APP_ID }}
ALGOLIA_API_KEY: ${{ secrets.ALGOLIA_API_KEY }}
CONFIG: ${{ steps.algolia_config.outputs.config }}
run: |
docker run \
--env APPLICATION_ID=${ALGOLIA_APP_ID} \
--env API_KEY=${ALGOLIA_API_KEY} \
--env "CONFIG=${CONFIG}" \
algolia/docsearch-scraper

此处的secrets.ALGOLIA_APP_IDsecrets.ALGOLIA_API_KEY应在github的项目里配置对应密钥,详细操作见:配置密钥

可更改github action触发条件:

  • pushmain分支触发:

    on:
    push:
    branches:
    - master
  • 发布成功后触发:

    on: deployment
  • 定时触发:

    on: deployment
  • 手动触发:

    on: deployment

问题&解决方案

  1. 执行拉取algolia/docsearch-scraper命令时超时
  • 可尝试在虚拟机中安装clash---未尝试

  • 可从github网站中获取压缩包,然后解压,构建镜像

  • cloudflare注册部署:

    Cloudflare是一个全球性的云平台,它为世界各地的各种规模的企业提供广泛的网络服务,从而使企业更加安全,同时提高其关键互联网资产的性能和可靠性。

    1. 官网注册用户

    2. 在自己的githubfork CF-Workers-docker.io项目

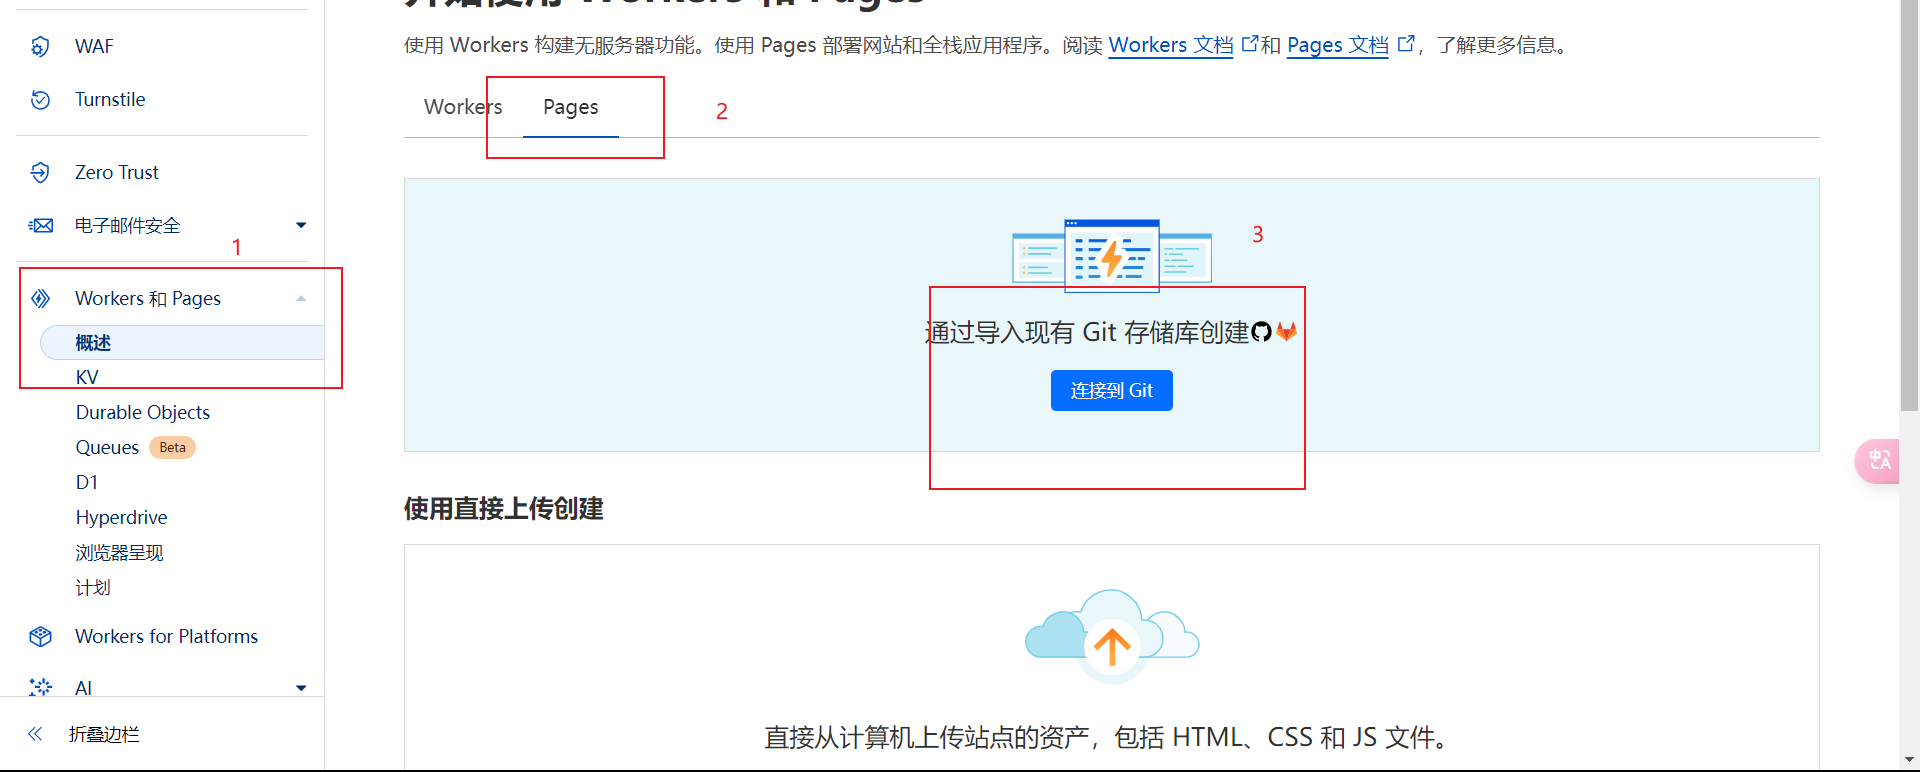
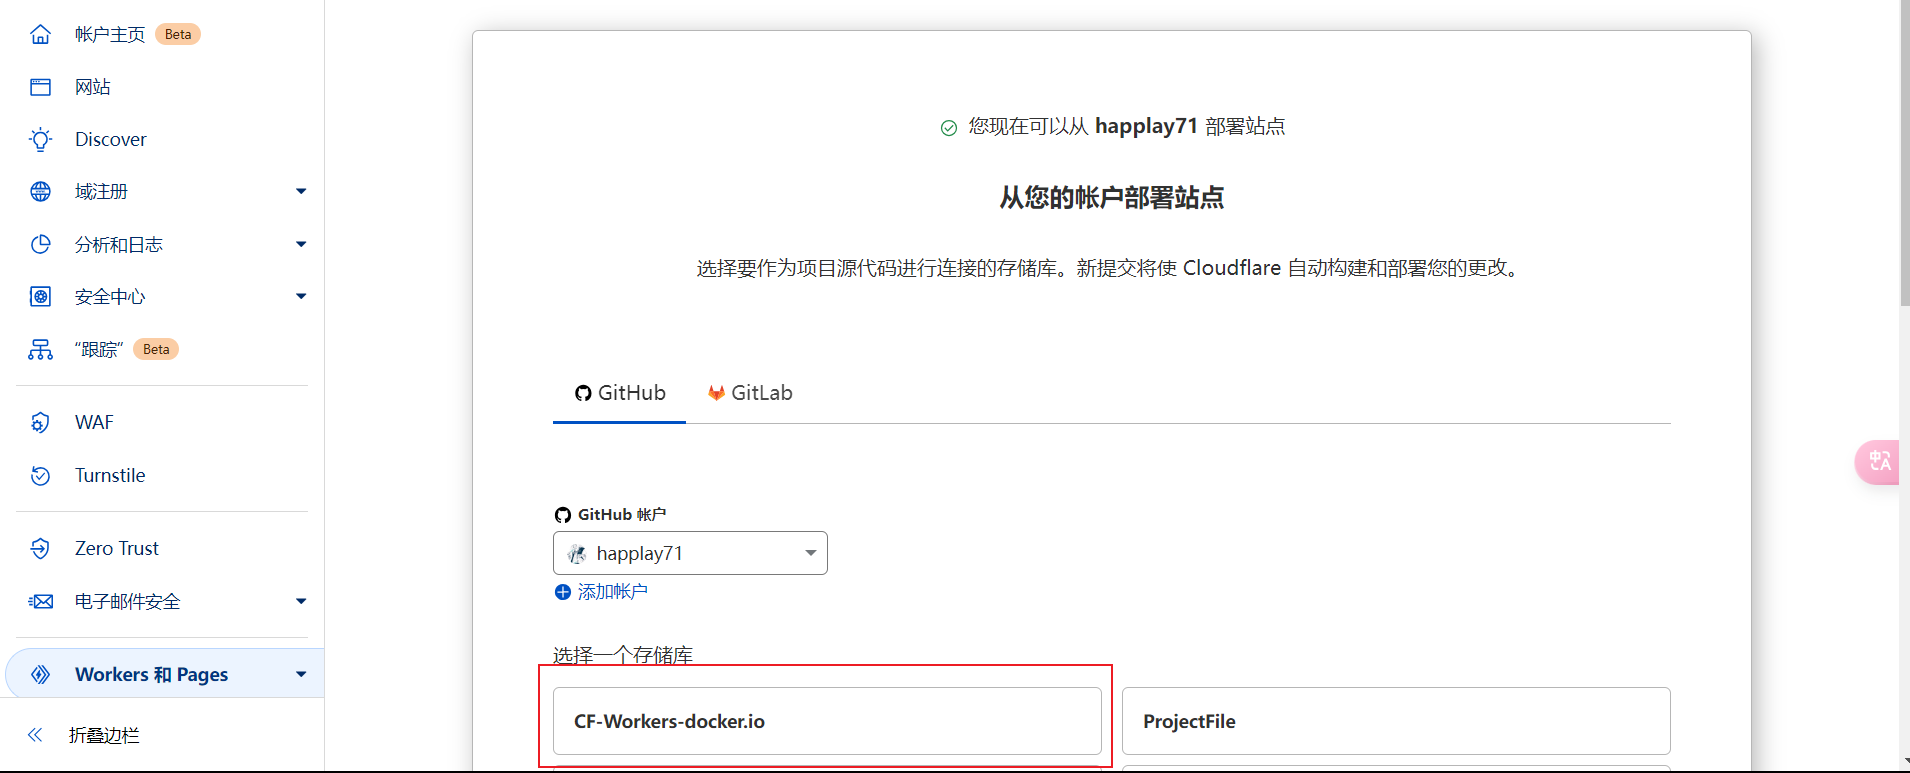
    3. 进入CF官网按照一下步骤执行

    按照流程默认创建即可。

    后续可能需要自备域名、构建站点等操作,未实现……

  • 使用他人构建好的站点:

    (目前可用)

    Docker 镜像站1:docker.888666222.xyz
    Docker 镜像站2:docker.1panel.live

使用 Github Actions 自动部署前端项目

· 4 min read
Happlay71
一个渴望成为技术大佬的小白

创建工作流

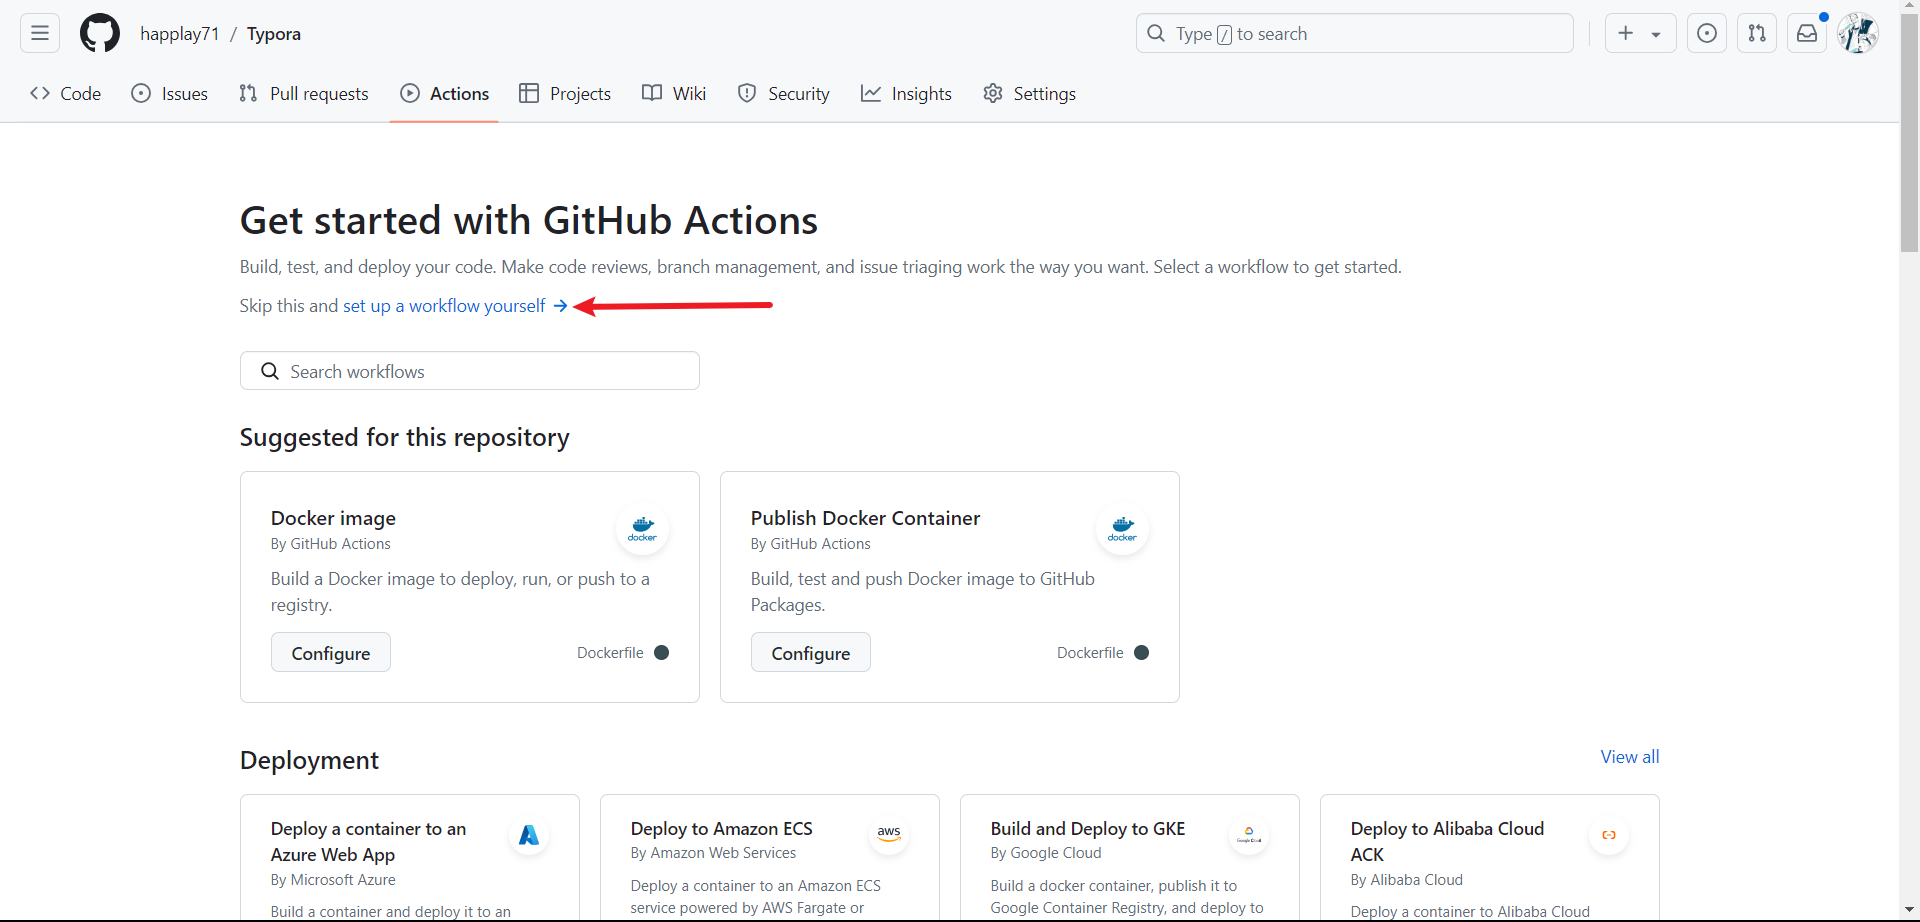
点击项目仓库中的 Actions 选项

可以选择set up a workflow yourself创建一个新的工作流然后直接提交空文件,或者在下方选择一个模板 点击start commit,这两种方式都会在项目目录下会新建.github/workflow/main.yml文件

修改配置文件

更新本地代码,将远程仓库中的代码拉取下来,在本地修改mian.yml配置文件

name: Auto Deploy
on:
push:
branches:
- main # 保持 main 分支作为触发条件

jobs:
build-and-deploy:
runs-on: ubuntu-latest
steps:
- name: Checkout code
uses: actions/checkout@v2 # 检出代码仓库

- name: Setup Node.js
uses: actions/setup-node@v2 # 设置 Node.js 环境
with:
node-version: '20.9.0' # 更新为你需要的 Node.js 版本

- name: Install dependencies
run: npm install # 使用 npm 安装依赖(根据自身情况修改)

- name: Build project
run: npm run build # 使用 npm 执行构建命令

- name: Deploy to Aliyun
uses: easingthemes/ssh-deploy@v4.1.10 # 通过 SSH 部署项目到阿里云
with:
SSH_PRIVATE_KEY: ${{ secrets.SERVER_SSH_KEY }}
REMOTE_HOST: ${{ secrets.USER_HOST }}
REMOTE_USER: ${{ secrets.USER_NAME }} # 通常阿里云 CentOS 7 默认用户是 root
SOURCE: "build/" # 确保这是你的构建输出目录
ARGS: "-rltgoDzvO --delete"
TARGET: /nginx/html/build # 修改为你想要部署到服务器上的路径

接下来在项目仓库中配置设置密钥

配置密钥

在服务器配置密钥 在服务器当前用户目录下,输入

ssh-keygen -m PEM -t rsa -b 4096

生成密钥文件,然后连续按下两次回车

这时候,就在用户目录下的.ssh文件夹中生成了私钥文件id_dsa、公钥文件id_dsa.pub,根据公钥文件生成authorized_keys,并给以上三个文件分别设置权限

cat id_rsa.pub >> authorized_keys
chmod 600 id_rsa
chmod 600 id_rsa.pub
chmod 600 authorized_keys

这样,服务器端就设置完成了

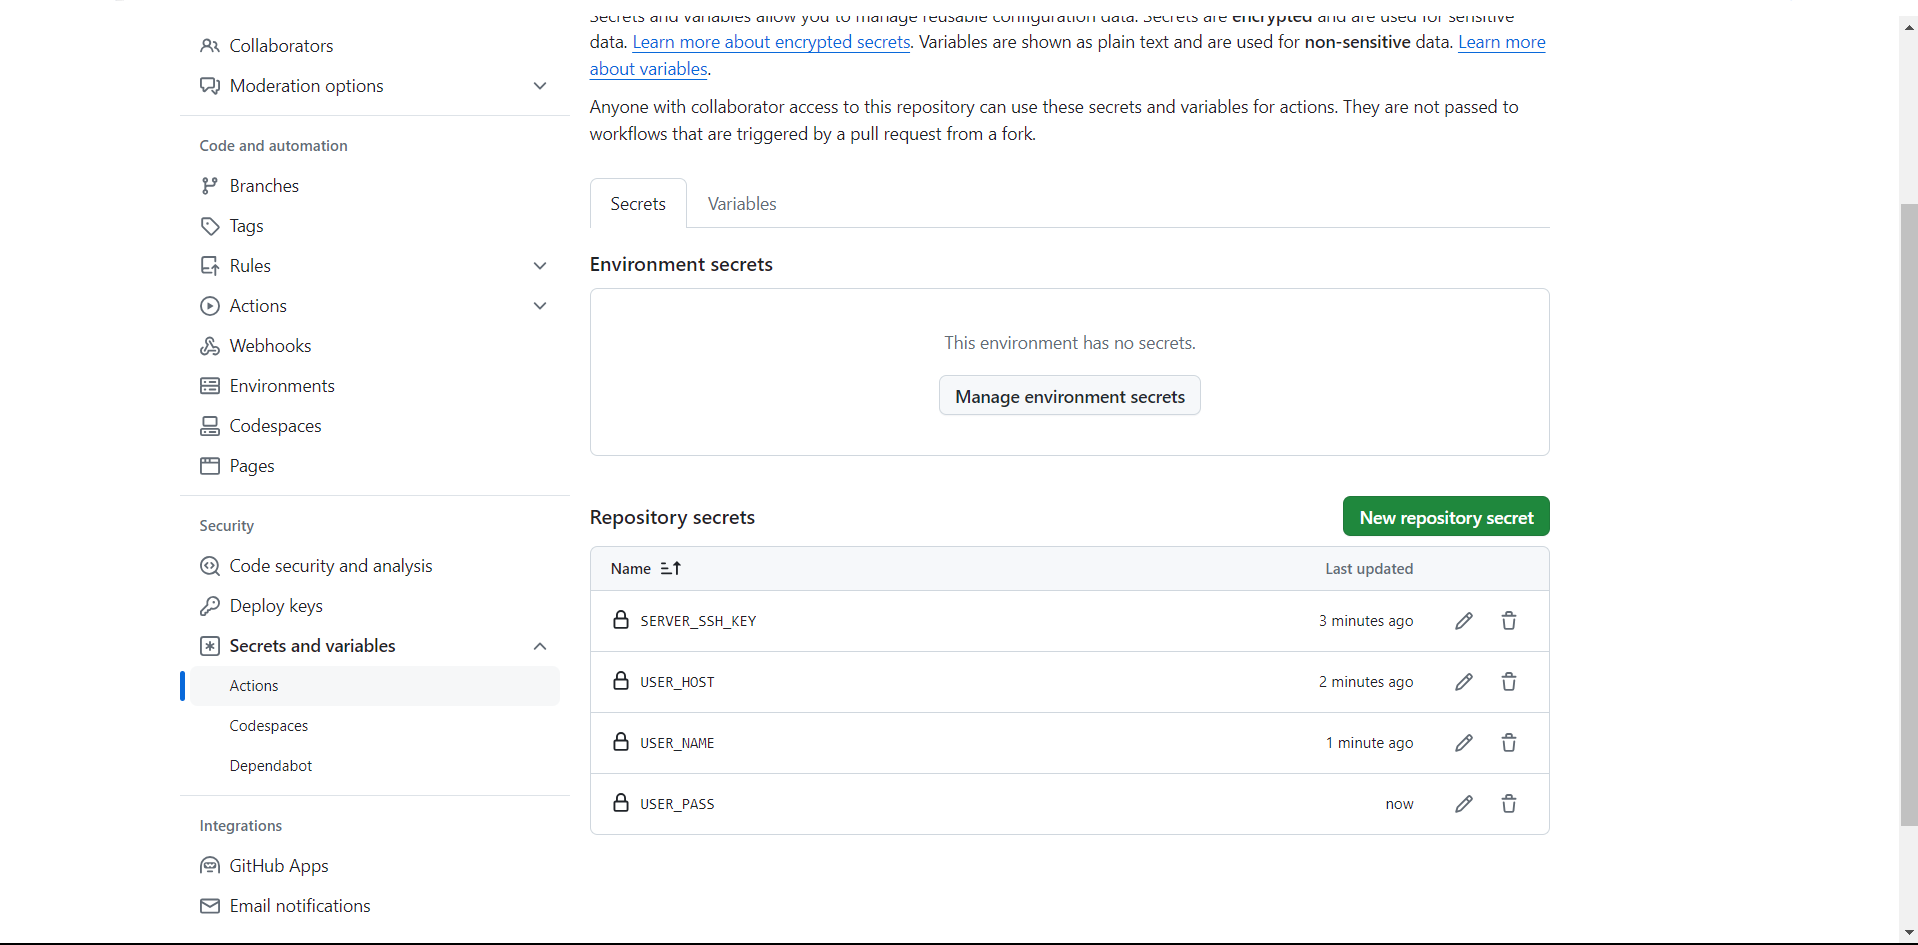
在Github仓库配置密钥 在Settings下的Secrets and variables中的Actions中添加仓库密钥

在服务器中cat密钥,将所有内容复制到新的Repository secrets中,并填入服务器IP到 USER_HOST,填入服务器用户到USER_NAME

查看私钥

cat id_rsa

配置完成效果

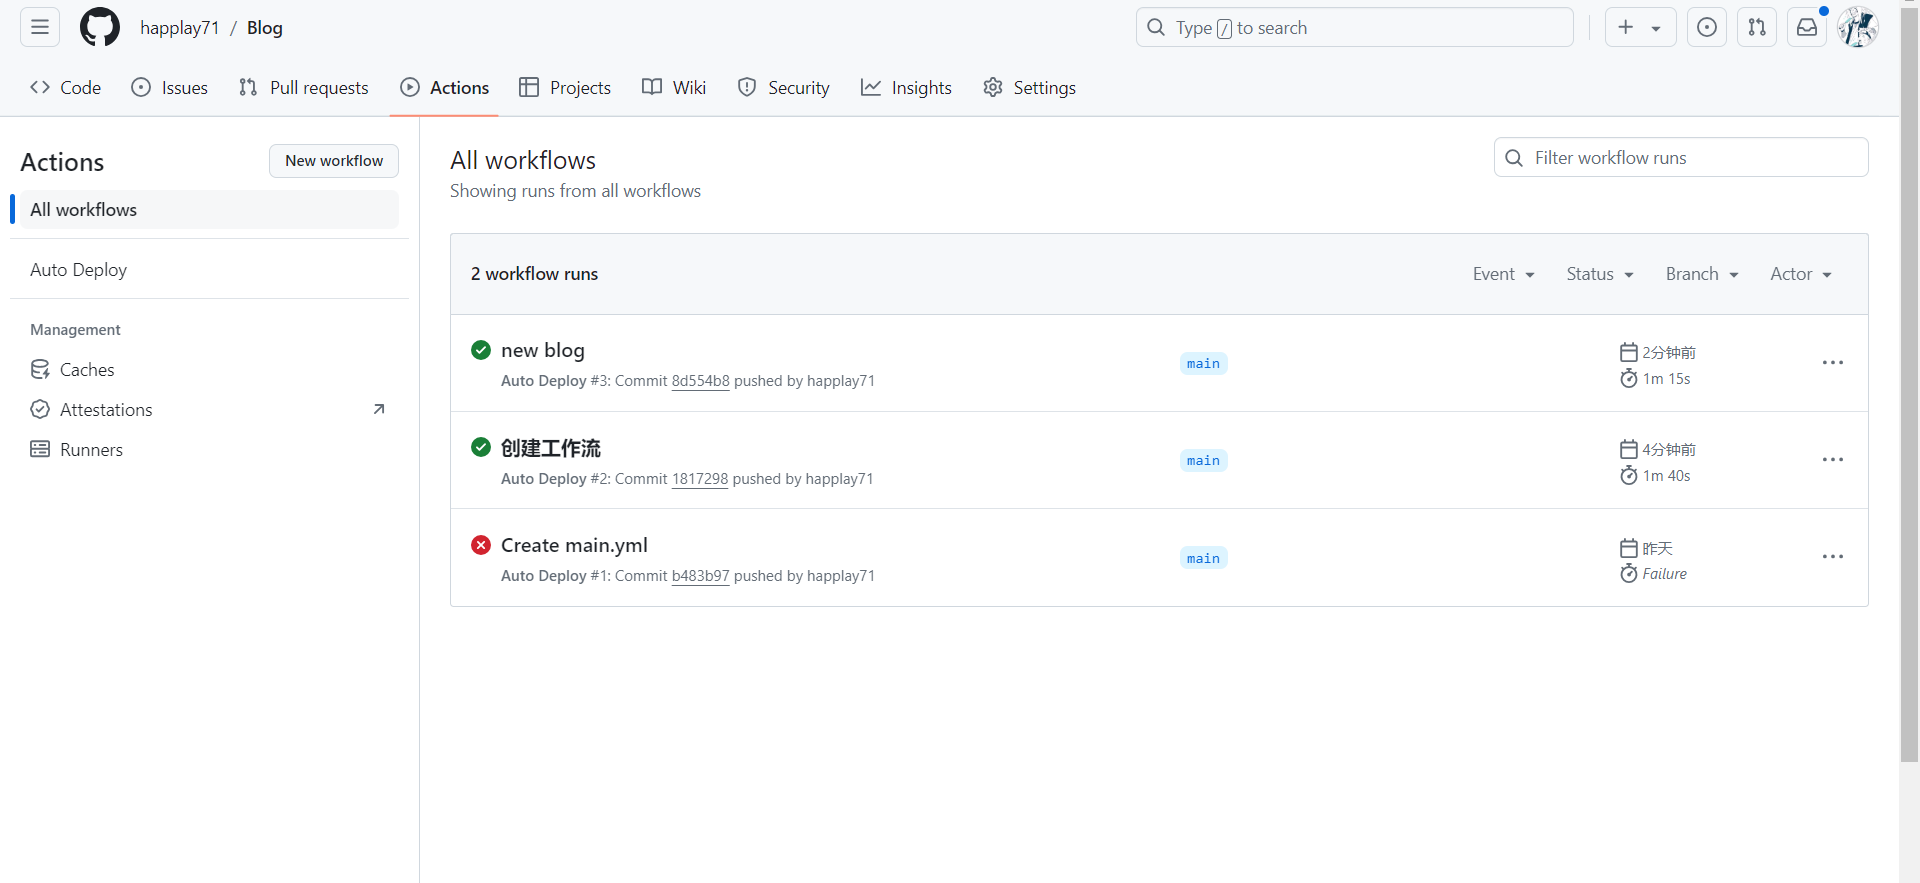
提交代码 将代码提交后,会自动触发工作流,可以在Ations界面看工作流工作状况

出现绿色的对号就是运行成功了,现在服务器上文件应该已经更新了

注意

打包部署前端的时候,如果文件夹名字有大写,可能会出现找不到文件的情况 原因是 Git 默认是不区分大小写的,可以使用下面的代码进行更改

获取当前项目大小写是否忽略

git config --get core.ignorecase

git config core.ignorecase # 可以用core 核心 ignore 忽略 case 大小写来记忆

true # 忽略大小写

关闭大小写忽略

git config core.ignorecase false

参考文章

使用 Github Actions 自动部署前端

redis主从集群搭建

· 2 min read
Happlay71
一个渴望成为技术大佬的小白

遇到情况

redis-cli -p 7002 -a 密码

127.0.0.1:7002> REPLICAOF 192.168.88.130 7001
OK
127.0.0.1:7001> info replication
# Replication
role:slave
master_host:主机IP
master_port:7001
master_link_status:down # 此处应为up
…………


redis-cli -p 7001 -a

127.0.0.1:7001> info replication
# Replication
role:master
connected_slaves:0 ## 此处为0

原因

1)主机设置了密码,那么我们需要在从机里面写上你主机的密码 所以我们的redis7002.conf 和 redis7003.conf 文件的内容应该如下:

7002

replicaof 127.0.0.1 7001
masterauth *****

7003同理

参数解析: replicaof 表明自己是从机,他的主机的ip地址是127.0.0.1(本机),端口号是7001。 masterauth是主机的密码。

解决问题二、也许你的系统防火墙并没有开放主机的端口。这里我们要把6379端口号打开。

firewall-cmd --permanent --add-port=7001/tcp
firewall-cmd --reload

REPLICAOF NO ONE:当使用 REPLICAOF NO ONE 命令时,当前 Redis 服务器将停止与主服务器的数据同步,不再充当任何主服务器的从节点

redis-cli -p 7002 -a 密码


127.0.0.1:7002>REPLICAOF NO ONE # 用于停止当前 Redis 服务器作为任何主服务器的复制节点
127.0.0.1:7002> REPLICAOF 192.168.88.130 7001
OK
127.0.0.1:7001> info replication
# Replication
role:slave
master_host:主机IP
master_port:7001
master_link_status:up
…………


redis-cli -p 7001 -a

127.0.0.1:7001> info replication
# Replication
role:master
connected_slaves:1

git推送后git仓库显示未更改

· 2 min read
Happlay71
一个渴望成为技术大佬的小白

事件起因

我在add代码前修改了github中对应仓库的名字,然后本地用git remote rm origin命令移除了和远程仓库的关联。

原因

接着运行git remote add origin github:github.com:用户名/仓库名.git命令:

  • 使用git remote add origin github:github.com:用户名/仓库名.git 只是添加了一个名为 origin 的远程仓库,并没有设置本地分支与远程分支之间的跟踪关系。为了设置跟踪关系,你需要明确地告诉 Git 你的本地分支要跟踪哪个远程分支。

解决

通过git branch --set-upstream-to=origin/master master命令连接本地及远程分支

建议

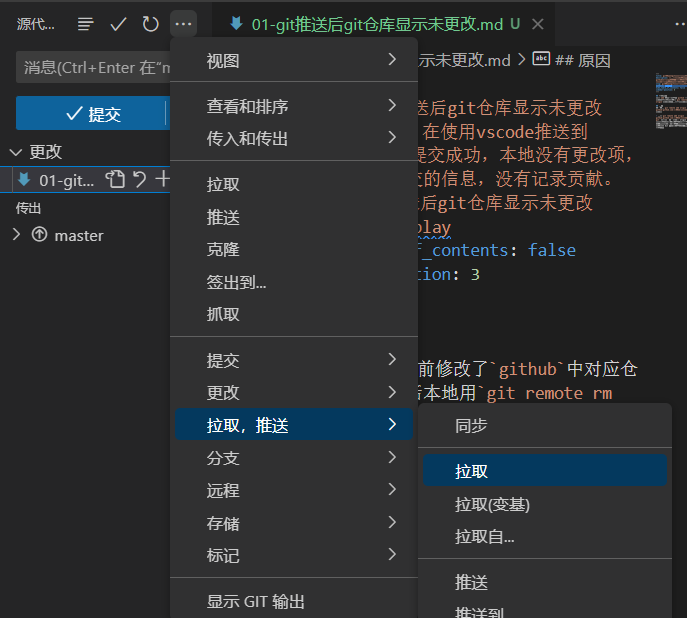
在推送分支前先用git pull命令或通过vscode

Snipaste_2024-07-01_09-38-00

拉取远程分支最新代码再使用git push推送到远程仓库

KnowledgeSpace-后端

· 31 min read
Happlay71
一个渴望成为技术大佬的小白

操作说明

超级管理员

  • 一位

  • 可注册用户(目前仅ROOT)

  • 可修改用户为管理员

  • 可创建任意用户的文件夹(请勿创建他人的根目录)

  • 删除他人文件夹或文件

  • 不可删除自身

  • 管理员↓

管理员

  • 可添加用户
  • 可修改用户信息(姓名,密码)
  • 可删除用户
  • 角色↓

用户

  • 自身信息
    • 可上传、删除头像
    • 可修改用户名,密码
    • 可重置密码
    • 可设置邮箱
    • 可删除自己
  • 文件夹
    • 可创建文件夹
    • 可修改文件夹名
    • 可删除除根目录外的自身的文件夹
  • 文件
    • 可创建md文档
    • 可上传文件(md,word,pdf)
    • 可修改文件名
    • 可修改文件内容(md,word)
    • 可删除自身的文件
  • 通用↓

通用

  • 可分页查询用户
  • 可通过姓名查询(模糊匹配)
  • 可查看用户文件夹
  • 可查看文件内容(md,word)

数据库

报错

端口占用

问题: 使用IDEA运行Spring Boot项目时,提示端口被占用.Web server failed to start. Port 8000 was already in use.

解决方法 1.更换端口 在更换多个端口后,依然报错。

2.查看是什么占用的端口

发现端口并没有被占用。

3.最终解决 除了端口确实被占用之外,还有一种可能就是端口属于系统保留端口,idea也会报端口被占用。 我们使用netsh interface ipv4 show excludedportrange protocol=tcp查看

我们发现我们之前使用的端口在7985~8084范围内。 知道原因后,我们有两个中解决方法: 一:选择这些端口范围之外的端口。 二:使用命令行修改动态端口的范围,使得这个保留端口的范围避开我们需要的端口范围。

原文链接:https://blog.csdn.net/zhengshuangyue/article/details/123181832

接口文档的配置

检查 Knife4j 配置

确保 Knife4j 配置正确,特别是在 Spring Boot 项目中,需要正确配置 Knife4j 的依赖和相关参数。

Maven 依赖配置示例:

xml复制代码<dependency>
<groupId>com.github.xiaoymin</groupId>
<artifactId>knife4j-spring-boot-starter</artifactId>
<version>3.0.2</version>
</dependency>

Spring Boot 配置示例(application.yml)(如果下面的配置文件写了,这里可忽略):

knife4j:
enable: true
openapi:
title: "Your API Documentation"
version: 1.0
contact:
name: "Your Contact Name"
email: "your@email.com"
url: "https://yourwebsite.com"
license:
name: "Apache License 2.0"
url: "https://www.apache.org/licenses/LICENSE-2.0.html"

确保配置中的参数正确,特别是 enabled: true 表示启用 Swagger UI。

  • knife4j.enable: 启用 Knife4j。设置为 true 表示启用 Knife4j 功能,可以访问生成的 Swagger UI 页面查看 API 文档。

  • knife4j.openapi.title: 设置 OpenAPI 文档的标题。此标题将显示在 Swagger UI 页面上,通常用来描述 API 文档的名称或项目名称。在这个例子中,标题被设置为 "Your API Documentation"。

  • knife4j.openapi.version: 设置 OpenAPI 文档的版本号。此版本号将显示在 Swagger UI 页面上,帮助用户了解当前文档的版本。在这个例子中,版本号被设置为 1.0

  • knife4j.openapi.contact

    : 设置联系人信息:

    • knife4j.openapi.contact.name: 设置 API 文档的联系人姓名。
    • knife4j.openapi.contact.email: 设置 API 文档的联系人邮箱地址。
    • knife4j.openapi.contact.url: 设置 API 文档的联系地址 URL,通常是相关项目或组织的网站链接。
  • knife4j.openapi.license

    : 设置许可证信息:

    • knife4j.openapi.license.name: 设置 API 文档的许可证名称,例如 Apache License 2.0。
    • knife4j.openapi.license.url: 设置 API 文档的许可证 URL,通常是具体许可证条款的网址链接,供用户查阅详细信息。

在config文件夹里写Knife4jConfig配置文件

package com.happlay.ks.config;

import org.springframework.context.annotation.Bean;
import org.springframework.context.annotation.Configuration;
import springfox.documentation.builders.PathSelectors;
import springfox.documentation.builders.RequestHandlerSelectors;
import springfox.documentation.spi.DocumentationType;
import springfox.documentation.spring.web.plugins.Docket;
import springfox.documentation.swagger2.annotations.EnableSwagger2WebMvc;


@Configuration
@EnableSwagger2WebMvc
public class Knife4jConfig {
@Bean
public Docket api() {
return new Docket(DocumentationType.SWAGGER_2) // 使用 OAS 3.0 文档类型
.apiInfo(new ApiInfoBuilder()
.title("接口文档")
.description("KnowledgeSpace")
.version("1.0")
.build())
.select()
.apis(RequestHandlerSelectors.basePackage("com.happlay.ks.controller")) // 与对应的Controller层一致
.paths(PathSelectors.any())
.build();
}
}

创建工具类-common

工具类(Utility Class)是指那些包含一组静态方法或常量的类,这些方法或常量通常是与特定任务或一组相关任务相关联的。工具类不持有任何状态,不创建实例,提供的是一些通用功能,供其他类和组件调用。

工具类的特点

  1. 静态方法:工具类中的方法通常是静态的,因为它们不需要依赖类的实例来调用。
  2. 不可实例化:通常通过私有构造函数(private constructor)来防止实例化。
  3. 通用性强:提供通用、复用的功能,简化其他类的开发工作。

工具类的作用

  1. 代码复用:将通用的功能抽取到工具类中,避免代码重复,提高代码的复用性。
  2. 代码清晰:将杂乱的工具性代码集中到工具类中,使得业务类的逻辑更加清晰。
  3. 维护性高:集中管理通用功能,如果需要修改某个通用功能,只需要修改工具类中的方法。

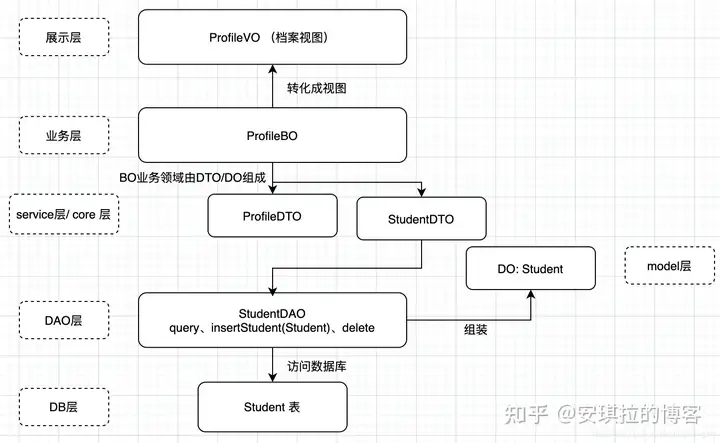
DTO,VO,POJO

img

实现邮箱验证

为了使用谷歌的邮箱来发送邮件,你需要配置SMTP服务器,并确保你的应用可以通过Gmail的SMTP服务器发送邮件。以下是实现这个功能的完整流程,包括代码示例:

1. 添加依赖

确保在pom.xml中添加了spring-boot-starter-mail依赖:

<dependency>
<groupId>org.springframework.boot</groupId>
<artifactId>spring-boot-starter-mail</artifactId>
</dependency>

2. 配置邮件属性

application.propertiesapplication.yml中添加Gmail SMTP配置:

  spring:
mail:
host: smtp.163.com
port: 587
username: your-email@163.com
password: your-email-password
properties:
mail:
smtp:
auth: true
starttls:
enable: true
required: true
socketFactory:
class: javax.net.ssl.SSLSocketFactory
fallback: false
  1. spring.mail.host: smtp.gmail.com
    • 指定邮件服务器的主机地址为 smtp.gmail.com,这是用于发送邮件的Gmail SMTP服务器地址。
  2. spring.mail.port: 587
    • 设置邮件服务器的端口号为 587,这是Gmail SMTP服务器的TLS加密连接端口。
  3. spring.mail.username: your-email@gmail.com
    • 指定用于登录SMTP服务器的邮箱账号,这里替换为你的Gmail邮箱地址。
  4. spring.mail.password: your-password
    • 设置用于登录SMTP服务器的邮箱密码,这里替换为你的Gmail邮箱密码。这是敏感信息,应该保护好,避免直接暴露在公开的代码仓库中。
  5. spring.mail.properties.mail.smtp.auth: true
    • 配置SMTP认证机制为开启,确保可以使用指定的用户名和密码进行SMTP服务器的认证。
  6. spring.mail.properties.mail.smtp.starttls.enable: true
    • 开启STARTTLS支持,这是一种安全传输协议,用于在SMTP连接中启用TLS加密。
  7. spring.mail.properties.mail.smtp.ssl.trust: smtp.gmail.com
    • 配置SMTP服务器的SSL信任,指定信任的SMTP服务器地址为 smtp.gmail.com,确保与Gmail SMTP服务器建立安全连接。

3. 创建邮件服务类

创建一个服务类来处理邮件发送逻辑:

import org.springframework.beans.factory.annotation.Autowired;
import org.springframework.mail.SimpleMailMessage;
import org.springframework.mail.javamail.JavaMailSender;
import org.springframework.stereotype.Service;

@Service
public class EmailService {

@Resource
private JavaMailSender mailSender;

public void sendVerificationCode(String fromEmail, String to, String subject, String text) {
SimpleMailMessage message = new SimpleMailMessage();
message.setFrom(fromEmail); // 直接设置完整的发件人邮箱地址
message.setTo(to);
message.setSubject(subject);
message.setText(text);
mailSender.send(message);
}
}

4. 验证码生成与验证逻辑

在你的服务层中实现生成验证码并发送邮件的逻辑:

import org.springframework.stereotype.Service;

import java.util.Random;
import java.util.concurrent.ConcurrentHashMap;
import java.util.concurrent.TimeUnit;

@Service
public class VerificationService {

private final ConcurrentHashMap<String, String> emailCodeMap = new ConcurrentHashMap<>();
private final ConcurrentHashMap<String, Long> emailCodeTimeMap = new ConcurrentHashMap<>();

@Autowired
private EmailService emailService;

public void sendVerificationEmail(String email) {
String code = generateVerificationCode();
emailCodeMap.put(email, code);
emailCodeTimeMap.put(email, System.currentTimeMillis());

String subject = "Your Verification Code";
String text = "Your verification code is: " + code;
emailService.sendVerificationCode(email, subject, text);
}

public boolean verifyCode(String email, String code) {
if (!emailCodeMap.containsKey(email)) {
return false;
}
long currentTime = System.currentTimeMillis();
long sentTime = emailCodeTimeMap.get(email);
if (currentTime - sentTime > TimeUnit.MINUTES.toMillis(5)) {
emailCodeMap.remove(email);
emailCodeTimeMap.remove(email);
return false;
}
return emailCodeMap.get(email).equals(code);
}

private String generateVerificationCode() {
Random random = new Random();
int code = random.nextInt(999999);
return String.format("%06d", code);
}
}

5. 控制层逻辑

在控制层中添加相应的接口来发送验证码和验证验证码:

import org.springframework.beans.factory.annotation.Autowired;
import org.springframework.web.bind.annotation.*;

@RestController
@RequestMapping("/api")
public class VerificationController {

@Autowired
private VerificationService verificationService;

@PostMapping("/sendVerificationEmail")
public void sendVerificationEmail(@RequestParam String email) {
verificationService.sendVerificationEmail(email);
}

@PostMapping("/verifyCode")
public boolean verifyCode(@RequestParam String email, @RequestParam String code) {
return verificationService.verifyCode(email, code);
}
}

6. 测试

启动你的Spring Boot应用,并通过发送HTTP请求测试邮件发送和验证码验证功能。

curl -X POST "http://localhost:8080/api/sendVerificationEmail?email=recipient-email@gmail.com"
curl -X POST "http://localhost:8080/api/verifyCode?email=recipient-email@gmail.com&code=123456"

这套流程可以确保你使用Gmail发送验证码邮件,并通过控制层接口进行发送和验证。

application.yml

server:
port: 8000
servlet:
context-path: /api
spring:
datasource:
url: jdbc:mysql://localhost:3306/knowledgespace?useUnicode=true&characterEncoding=utf-8
username: root
password: 547118
mvc:
path match:
# 兼容swagger
matching-strategy: ant_path_matcher
profiles:
active: test
devtools:
restart:
enabled: true #设置开启热部署
additional-paths: src/main/java #重启目录
exclude: WEB-INF/**
mail:
host: smtp.163.com
port: 587
username: 15931628498@163.com
password: KVRAFJIKCEPOZNUK
properties:
mail:
smtp:
auth: true
starttls:
enable: true
required: true
socketFactory:
class: javax.net.ssl.SSLSocketFactory
fallback: false
mybatis-plus:
configuration:
map-underscore-to-camel-case: true
log-impl: org.apache.ibatis.logging.stdout.StdOutImpl
global-config:
db-config:
logic-delete-field: isDelete
logic-delete-value: 1
logic-not-delete-value: 0

@LoginCheck 注解

annotation注解类

@Target(ElementType.METHOD)
@Retention(RetentionPolicy.RUNTIME)
public @interface LoginCheck {
// 必须为其中的某个角色
String[] mustRole() default {};
}

aop

@Aspect
@Component
@Slf4j
public class RoleInterceptor {
@Resource
private UserService userService;

@Around("@annotation(loginCheck)")
public Object doInterceptor(ProceedingJoinPoint joinPoint, LoginCheck loginCheck) throws Throwable {
// 获取必须的权限数组,有其中之一即可继续执行
String[] mustRole = loginCheck.mustRole();
System.out.println(Arrays.deepToString(mustRole));
// 获取当前请求的上下文
RequestAttributes requestAttributes = RequestContextHolder.currentRequestAttributes( );
HttpServletRequest request = ((ServletRequestAttributes) requestAttributes).getRequest( );
// 获取请求头中的token
String token = request.getHeader("token");
// token为空
if(StringUtils.isBlank(token)){
throw new CommonException(ErrorCode.NOT_LOGIN_ERROR);
}
// 解析token
Integer userId = JwtUtils.getUserIdFromToken(token);
// 获取当前登录的用户
User userById = userService.getById(userId);
if(userById == null){
throw new CommonException(ErrorCode.NOT_LOGIN_ERROR);
}
// 仅登录
if(mustRole.length == 0) return joinPoint.proceed();
// 需要的权限放入set
HashSet<String> set = new HashSet<>(Arrays.asList(mustRole));
// 遍历当前具有的权限,当前具有的权限在set中说明可以通过
for (String role : userById.getRole()) {
if(set.contains(role)) return joinPoint.proceed();
}
throw new CommonException(ErrorCode.NO_AUTH_ERROR, "无权限");
}
}

@Aspect

  • 用途: 标记一个类为切面(Aspect)。
  • 作用: 用于定义跨越应用程序多个模块的关注点(比如日志记录、事务管理、权限检查等)。
  • 配合 AOP 使用: 这个注解是 Spring AOP(Aspect-Oriented Programming,面向切面编程)的一部分。

@Component

  • 用途: 将一个类标记为 Spring 的组件(Component),表示该类是一个 Spring 容器的管理 Bean。
  • 作用: 使 Spring 容器可以自动检测并注册这个类为一个 Bean,等同于在 XML 配置文件中定义一个 <bean>
  • 自动扫描: 使用这个注解的类会被 Spring 的组件扫描机制自动发现和注册。

配置Spring Boot应用以启用AOP

确保你的Spring Boot应用已经启用了AOP。你可以在主应用程序类上添加@EnableAspectJAutoProxy注解:

java复制代码import org.springframework.boot.SpringApplication;
import org.springframework.boot.autoconfigure.SpringBootApplication;
import org.springframework.context.annotation.EnableAspectJAutoProxy;

@SpringBootApplication
@EnableAspectJAutoProxy
public class Application {
public static void main(String[] args) {
SpringApplication.run(Application.class, args);
}
}

在需要检查权限的方法上使用@LoginCheck注解

java复制代码@RestController
@RequestMapping("/admin")
public class AdminController {

@LoginCheck(mustRole = {UserRoleConstant.ROOT, UserRoleConstant.USER_ADMIN})
@PostMapping("/createUser")
public BaseResponse<Object> createUser(@RequestBody CreateUserRequest request) {
// 方法实现
}
}

配置分页

这段代码是一个 Spring Boot 项目中配置 MyBatis Plus 分页插件的配置类。以下是对每一部分的解释:

注解和类

@Configuration
@MapperScan("com.ynn.rent.mapper")
public class MybatisPlusConfig {
  • @Configuration:表示这是一个配置类,Spring 容器会在启动时加载这个类中的配置。
  • @MapperScan("com.ynn.rent.mapper"):指定要扫描的 Mapper 接口所在的包。这样 Spring Boot 在启动时会自动扫描这个包下的所有 Mapper 接口并将它们注册为 Spring Bean。com.ynn.rent.mapper 是你项目中存放 MyBatis Mapper 接口的包路径。

配置分页插件的 Bean

@Bean
public MybatisPlusInterceptor mybatisPlusInterceptor() {
MybatisPlusInterceptor interceptor = new MybatisPlusInterceptor();
interceptor.addInnerInterceptor(new PaginationInnerInterceptor(DbType.MYSQL));
return interceptor;
}
  • @Bean:用于将方法返回的对象注册为 Spring 的 Bean。
  • MybatisPlusInterceptor mybatisPlusInterceptor():定义一个 MyBatis Plus 的拦截器 MybatisPlusInterceptor 的 Bean。
  • MybatisPlusInterceptor interceptor = new MybatisPlusInterceptor();:创建一个 MybatisPlusInterceptor 对象。
  • interceptor.addInnerInterceptor(new PaginationInnerInterceptor(DbType.MYSQL));:为 MybatisPlusInterceptor 添加一个 PaginationInnerInterceptor 内部拦截器。PaginationInnerInterceptor 是 MyBatis Plus 提供的分页拦截器,用于处理分页查询。构造函数中的 DbType.MYSQL 指定了数据库类型为 MySQL,这样分页插件会使用适合 MySQL 的分页方言。
  • return interceptor;:将配置好的拦截器返回并注册为 Spring Bean。

完整代码

@Configuration
@MapperScan("com.ynn.rent.mapper")
public class MybatisPlusConfig {
@Bean
public MybatisPlusInterceptor mybatisPlusInterceptor() {
MybatisPlusInterceptor interceptor = new MybatisPlusInterceptor();
interceptor.addInnerInterceptor(new PaginationInnerInterceptor(DbType.MYSQL));
return interceptor;
}
}

解释

  1. @Configuration 注解

    • 标识这个类是一个配置类,Spring 会在应用启动时加载该配置类并应用其中的配置。
  2. @MapperScan 注解

    • 指定要扫描的 Mapper 接口包路径,这样 Spring Boot 会自动扫描这个包下的所有 Mapper 接口并将它们注册为 Spring Bean。
    • com.ynn.rent.mapper 是你的项目中存放 MyBatis Mapper 接口的包路径。
  3. @Bean 注解

    • 声明一个方法返回的对象作为 Spring Bean 注册到 Spring 容器中。
  4. MybatisPlusInterceptor 拦截器

    • MybatisPlusInterceptor 是 MyBatis Plus 的核心拦截器,用于拦截和处理 MyBatis 的 SQL 执行流程。
    • PaginationInnerInterceptor 是一个内部拦截器,用于处理分页查询逻辑。它会拦截分页查询的 SQL 请求,并根据指定的数据库类型(如 MySQL)生成适合该数据库的分页查询语句。

总结

这段配置代码的主要功能是为你的 Spring Boot 项目配置 MyBatis Plus 的分页插件,使得你可以在应用中使用 MyBatis Plus 提供的分页功能。通过这段配置,你可以轻松地对数据库中的数据进行分页查询,而无需手动编写复杂的分页 SQL 语句。

common包

设置常用类:PageRequest类

@Data
@AllArgsConstructor
@NoArgsConstructor
public class PageRequest {
/**
* 当前页数
*/
private long current;

/**
* 每页数据数量
*/
private long pageSize;
}

model-vo-user

创建UserVo类-返回给前端数据

@Data
@AllArgsConstructor
@NoArgsConstructor
public class UserVo {
/**
* 主键
*/
private Integer id;

/**
* 用户名
*/
private String username;

/**
* 职务
*/
private String role;

/**
* 头像
*/
private String avatarUrl;

/**
* 创建时间
*/
private LocalDateTime createTime;

/**
* 更新时间
*/
private LocalDateTime updateTime;

/**
* 是否激活
*/
private Boolean isDelete;
}

Service

@Override
public UserVo getVo(User user) {
if (user == null) throw new CommonException(ErrorCode.NOT_FOUND_ERROR);
UserVo userVo = new UserVo();
BeanUtil.copyProperties(user, userVo);
return userVo;
}

@Override
public List<UserVo> getVos(List<User> users) {
ArrayList<UserVo> userVos = new ArrayList<>();
for (User user : users) {
userVos.add(getVo(user));
}
return userVos;
}

@Override
public Page<UserVo> selectPage(PageRequest pageRequest) {
Page<User> userPage = new Page<>(pageRequest.getCurrent(), pageRequest.getPageSize());
this.page(userPage);
Page<UserVo> userVoPage = new Page<>(userPage.getCurrent(), userPage.getSize(), userPage.getTotal());
userVoPage.setRecords(this.getVos(userPage.getRecords()));
return userVoPage;
}

@Component 注解

FileUtils 类上添加 @Component 注解: 确保 FileUtils 类上有 @Component 注解,这样 Spring Boot 才能扫描并注册它作为一个 bean。

上传文件(不完善)

保存在本地target下

枚举类

public enum FileTypeEnum {
AVATAR("avatar"), // 头像文件
FILE("file"); // 文档文件,例如包含文字的文件

private final String type;

FileTypeEnum(String type) {
this.type = type;
}

public String getType() {
return type;
}
}

配置类

@Data
@Component
@ConfigurationProperties(prefix = "file")
public class FileConfig {
private long maxMb;
private String avatarPath; // 设置头像路径
private String filePath; // 设置笔记文件路径
}

utils

@Component
public class FileUtils {

@Autowired
private FileConfig fileConfig;

private final ResourceLoader resourceLoader;

@Autowired
public FileUtils(ResourceLoader resourceLoader) {
this.resourceLoader = resourceLoader;
}

public String storeTemp(byte[] data, FileTypeEnum fileTypeEnum, int id) {
if (data == null) {
throw new CommonException(ErrorCode.NOT_FOUND_ERROR, "不存在临时文件");
}

String folderPath = getFolderPath(fileTypeEnum, id);
File folder = new File(folderPath);
if (!folder.isDirectory()) {
if (!folder.mkdirs()) {
throw new CommonException(ErrorCode.SYSTEM_ERROR, "创建文件夹失败");
}
}

String fileName = UUID.randomUUID().toString();
File file = new File(folderPath, fileName);
try (FileOutputStream fileOutputStream = new FileOutputStream(file)) {
fileOutputStream.write(data);
} catch (IOException e) {
e.printStackTrace();
throw new CommonException(ErrorCode.SYSTEM_ERROR, "创建文件失败");
}
return getRelativePath(fileTypeEnum, id, fileName);
}

public String saveFile(MultipartFile file, FileTypeEnum fileTypeEnum, int id) {
if (file.isEmpty()) {
throw new CommonException(ErrorCode.PARAMS_ERROR, "文件为空");
}
String originalFilename = file.getOriginalFilename();
if (originalFilename == null) {
throw new CommonException(ErrorCode.PARAMS_ERROR, "文件名为空");
}

String fileExtension = originalFilename.substring(originalFilename.lastIndexOf("."));
// String folderPath = getFolderPath(fileTypeEnum, id);

String folderPath = getFolderPath(fileTypeEnum, id);
System.out.println("Folder path: " + folderPath);
File folder = new File(folderPath);
if (!folder.isDirectory()) {
if (!folder.mkdirs()) {
throw new CommonException(ErrorCode.SYSTEM_ERROR, "创建文件夹失败");
}
}

String fileName = UUID.randomUUID().toString() + fileExtension;
File destFile = new File(folderPath, fileName);
try {
file.transferTo(destFile);
} catch (IOException e) {
e.printStackTrace();
throw new CommonException(ErrorCode.SYSTEM_ERROR, "保存文件失败");
}
return getRelativePath(fileTypeEnum, id, fileName);
}

private String getFolderPath(FileTypeEnum fileTypeEnum, int id) {
String basePath;
//获取jar包所在目录
ApplicationHome h = new ApplicationHome(getClass());
File jarF = h.getSource();
//在jar包所在目录下生成一个upload文件夹用来存储上传的图片
switch (fileTypeEnum) {
case AVATAR:
basePath = resolveResourcePath(jarF.getParentFile().toString(), fileConfig.getAvatarPath());
break;
case FILE:
basePath = resolveResourcePath(jarF.getParentFile().toString(), fileConfig.getFilePath());
break;
default:
throw new CommonException(ErrorCode.PARAMS_ERROR, "不支持的文件类型");
}
return Paths.get(basePath, String.valueOf(id)).toString();
}

private String getRelativePath(FileTypeEnum fileTypeEnum, int id, String fileName) {
return Paths.get("/", fileTypeEnum.getType(), String.valueOf(id), fileName).toString();
}

private String resolveResourcePath(String basePath, String resourcePath) {
try {
Resource resource = resourceLoader.getResource("file:" + basePath + resourcePath);
if (!resource.exists()) {
throw new CommonException(ErrorCode.SYSTEM_ERROR, "资源路径不存在: " + resourcePath);
}
File file = resource.getFile();
Path path = file.toPath();
if (!Files.exists(path)) {
Files.createDirectories(path);
}
return path.toString();
} catch (IOException e) {
throw new CommonException(ErrorCode.SYSTEM_ERROR, "解析资源路径失败: " + e.getMessage());
}
}

上传文件

1. 创建 FileUploadRequest

java复制代码import org.springframework.web.multipart.MultipartFile;

public class FileUploadRequest {
private MultipartFile file;
private FileTypeEnum fileType;
private int id;

// Getters and Setters
public MultipartFile getFile() {
return file;
}

public void setFile(MultipartFile file) {
this.file = file;
}

public FileTypeEnum getFileType() {
return fileType;
}

public void setFileType(FileTypeEnum fileType) {
this.fileType = fileType;
}

public int getId() {
return id;
}

public void setId(int id) {
this.id = id;
}
}

2. 修改 Controller 中的上传文件方法

在 Controller 中使用 FileUploadRequest 类作为参数:

java复制代码import org.springframework.beans.factory.annotation.Autowired;
import org.springframework.web.bind.annotation.*;
import org.springframework.web.multipart.MultipartFile;

@RestController
@RequestMapping("/file")
public class FileController {

@Autowired
private FileUtils fileUtils;

@PostMapping("/upload")
public BaseResponse<String> uploadFile(@ModelAttribute FileUploadRequest fileUploadRequest) {
MultipartFile file = fileUploadRequest.getFile();
FileTypeEnum fileType = fileUploadRequest.getFileType();
int id = fileUploadRequest.getId();

String filePath = fileUtils.saveFile(file, fileType, id);
return ResultUtils.success(filePath);
}
}

3. 注意点

由于 MultipartFile 是文件上传所需的类型,因此在接收上传请求时需要使用 @ModelAttribute@RequestParam 注解,而不是 @RequestBody。这是因为文件上传请求的 Content-Typemultipart/form-data,而不是 application/json

完整代码示例

FileUploadRequest

java复制代码import org.springframework.web.multipart.MultipartFile;

public class FileUploadRequest {
private MultipartFile file;
private FileTypeEnum fileType;
private int id;

// Getters and Setters
public MultipartFile getFile() {
return file;
}

public void setFile(MultipartFile file) {
this.file = file;
}

public FileTypeEnum getFileType() {
return fileType;
}

public void setFileType(FileTypeEnum fileType) {
this.fileType = fileType;
}

public int getId() {
return id;
}

public void setId(int id) {
this.id = id;
}
}

Controller 类

java复制代码import org.springframework.beans.factory.annotation.Autowired;
import org.springframework.web.bind.annotation.*;
import org.springframework.web.multipart.MultipartFile;

@RestController
@RequestMapping("/file")
public class FileController {

@Autowired
private FileUtils fileUtils;

@PostMapping("/upload")
public BaseResponse<String> uploadFile(@ModelAttribute FileUploadRequest fileUploadRequest) {
MultipartFile file = fileUploadRequest.getFile();
FileTypeEnum fileType = fileUploadRequest.getFileType();
int id = fileUploadRequest.getId();

String filePath = fileUtils.saveFile(file, fileType, id);
return ResultUtils.success(filePath);
}
}

通过以上步骤,你可以成功封装上传文件的请求参数,简化 Controller 方法的参数列表,同时保持代码的清晰和可维护性。

FileUtils类

import com.happlay.ks.common.ErrorCode;
import com.happlay.ks.config.FileConfig;
import com.happlay.ks.emums.FileTypeEnum;
import com.happlay.ks.exception.CommonException;
import org.springframework.beans.factory.annotation.Autowired;
import org.springframework.beans.factory.annotation.Value;
import org.springframework.core.io.ResourceLoader;
import org.springframework.stereotype.Component;
import org.springframework.web.multipart.MultipartFile;

import java.io.File;
import java.io.FileOutputStream;
import java.io.IOException;
import java.nio.charset.StandardCharsets;
import java.nio.file.Paths;
import java.util.*;

@Component
public class FileUtils {

@Autowired
private FileConfig fileConfig;

private final ResourceLoader resourceLoader;

@Value("${file.storage.root.path}")
private String storageRootPath;

@Autowired
public FileUtils(ResourceLoader resourceLoader) {
this.resourceLoader = resourceLoader;
}

// 保存文件
public String saveFile(MultipartFile file, FileTypeEnum fileTypeEnum, int id) {
if (file.isEmpty()) {
throw new CommonException(ErrorCode.PARAMS_ERROR, "文件为空");
}
String originalFilename = file.getOriginalFilename();
if (originalFilename == null) {
throw new CommonException(ErrorCode.PARAMS_ERROR, "文件名为空");
}

String fileExtension = originalFilename.substring(originalFilename.lastIndexOf("."));
String folderPath = getFolderPath(fileTypeEnum, id);
createDirectoryIfNotExists(folderPath);

String fileName = UUID.randomUUID().toString() + fileExtension;
File destFile = new File(folderPath, fileName);
try {
file.transferTo(destFile);
System.out.println("文件保存成功,路径:" + destFile.getAbsolutePath());
} catch (IOException e) {
e.printStackTrace();
throw new CommonException(ErrorCode.SYSTEM_ERROR, "保存文件失败");
}
return getRelativePath(fileTypeEnum, id, fileName);
}

public String saveMarkdownFile(String content, FileTypeEnum fileTypeEnum, int id) {
String folderPath = getFolderPath(fileTypeEnum, id);
createDirectoryIfNotExists(folderPath);

String fileName = UUID.randomUUID().toString() + ".md";
File file = new File(folderPath, fileName);
try (FileOutputStream fileOutputStream = new FileOutputStream(file)) {
fileOutputStream.write(content.getBytes(StandardCharsets.UTF_8));
System.out.println("Markdown 文件保存成功,路径:" + file.getAbsolutePath());
} catch (IOException e) {
e.printStackTrace();
throw new CommonException(ErrorCode.SYSTEM_ERROR, "保存文件失败");
}
return getRelativePath(fileTypeEnum, id, fileName);
}

public String saveImage(byte[] imageBytes, int id) {
String folderPath = getFolderPath(FileTypeEnum.PHOTO, id);
createDirectoryIfNotExists(folderPath);

String fileName = UUID.randomUUID().toString() + ".png";
File imageFile = new File(folderPath, fileName);
try (FileOutputStream fos = new FileOutputStream(imageFile)) {
fos.write(imageBytes);
System.out.println("图片保存成功,路径:" + imageFile.getAbsolutePath());
} catch (IOException e) {
e.printStackTrace();
throw new CommonException(ErrorCode.SYSTEM_ERROR, "保存图片失败");
}
return getRelativePath(FileTypeEnum.PHOTO, id, fileName);
}

private String getFolderPath(FileTypeEnum fileTypeEnum, int id) {
String basePath = new File(storageRootPath).getAbsolutePath();
switch (fileTypeEnum) {
case AVATAR:
return Paths.get(basePath, "avatar", String.valueOf(id)).toString();
case PHOTO:
return Paths.get(basePath, "document", "photo", String.valueOf(id)).toString();
case DOCUMENT:
return Paths.get(basePath, "document", String.valueOf(id)).toString();
default:
throw new CommonException(ErrorCode.PARAMS_ERROR, "不支持的文件类型");
}
}

private String getRelativePath(FileTypeEnum fileTypeEnum, int id, String fileName) {
return Paths.get(fileTypeEnum.getType(), String.valueOf(id), fileName).toString();
}

private void createDirectoryIfNotExists(String folderPath) {
File folder = new File(folderPath);
if (!folder.exists() && !folder.mkdirs()) {
throw new CommonException(ErrorCode.SYSTEM_ERROR, "创建文件夹失败");
}
}
}

FileImageUtils类

import org.springframework.beans.factory.annotation.Value;
import org.springframework.stereotype.Component;

import java.io.File;
import java.nio.charset.StandardCharsets;
import java.nio.file.Paths;
import java.util.*;
import java.util.regex.Matcher;
import java.util.regex.Pattern;

@Component
public class FileImageUtils {

@Value("${file.storage.root.path}")
private String storageRootPath;

// 替换MD里的图片
public String replacePathsInMD(byte[] fileBytes, Map<String, String> imagePathMap) {
String content = new String(fileBytes, StandardCharsets.UTF_8);
String basePath = new File(storageRootPath).getAbsolutePath();
System.out.println(basePath);

for (Map.Entry<String, String> entry : imagePathMap.entrySet()) {
String originalPath = entry.getKey();
String serverPath = entry.getValue();
String path = Paths.get(basePath, serverPath).normalize().toString();
content = content.replace(originalPath, path);
}

return content;
}

// 提取MD文件中的图片路径
public List<String> extractImagePathsFromMD(byte[] fileBytes) {
String content = new String(fileBytes, StandardCharsets.UTF_8);
List<String> imagePaths = new ArrayList<>();
Pattern pattern = Pattern.compile("!\\[[^\\]]*\\]\\(([^)]+)\\)");
Matcher matcher = pattern.matcher(content);
while (matcher.find()) {
imagePaths.add(matcher.group(1));
}
return imagePaths;
}

public byte[] readImage(String imagePath) throws IOException {
if (imagePath.startsWith("http://") || imagePath.startsWith("https://")) {
// 处理 URL 情况
URL url = new URL(imagePath);
try (InputStream in = url.openStream(); ByteArrayOutputStream buffer = new ByteArrayOutputStream()) {
byte[] data = new byte[1024];
int nRead;
while ((nRead = in.read(data, 0, data.length)) != -1) {
buffer.write(data, 0, nRead);
}
return buffer.toByteArray();
}
} else {
// 处理本地文件路径情况
Path path = Paths.get(imagePath);
return Files.readAllBytes(path);
}
}
}

FileTypeEnum类

public enum FileTypeEnum {
AVATAR("avatar"), // 头像文件
PHOTO("document/photo"), // 图片文件
DOCUMENT("document"); // 文档文件
private final String type;

FileTypeEnum(String type) {
this.type = type;
}

public String getType() {
return type;
}

public static FileTypeEnum fromFileName(String fileName) {
String extension = fileName.substring(fileName.lastIndexOf(".") + 1).toLowerCase();
switch (extension) {
case "jpg":
case "jpeg":
case "png":
case "gif":
return PHOTO; // 图片文件类型
case "md":
case "pdf":
case "doc":
case "docx":
return DOCUMENT; // 文档文件类型
default:
throw new IllegalArgumentException("Unsupported file type: " + extension);
}
}
}

uploadFile方法

@Override
public String uploadFile(UploadFileRequest uploadFileRequest, Integer userId) {
MultipartFile file = uploadFileRequest.getFile();
String originalFilename = file.getOriginalFilename();

if (file.isEmpty()) {
throw new CommonException(ErrorCode.PARAMS_ERROR, "文件内容不能为空");
}

if (originalFilename == null || originalFilename.isEmpty()) {
throw new CommonException(ErrorCode.PARAMS_ERROR, "不支持该文件类型");
}

FileTypeEnum fileType = FileTypeEnum.fromFileName(originalFilename);

if (fileType != FileTypeEnum.DOCUMENT) {
throw new CommonException(ErrorCode.PARAMS_ERROR, "仅支持文档文件类型");
}

String name = uploadFileRequest.getName();
Integer folderId = uploadFileRequest.getFolderId();

if (name.isEmpty()) {
throw new CommonException(ErrorCode.PARAMS_ERROR, "文件名不能为空");
}

LambdaQueryWrapper<File> queryWrapper = new LambdaQueryWrapper<>();
queryWrapper.eq(File::getName, name);
if (this.getOne(queryWrapper) != null) {
throw new CommonException(ErrorCode.PARAMS_ERROR, "文件名不能重复");
}

String relativePath = null;
try {
if (originalFilename.endsWith(".md")) {
byte[] fileBytes = file.getBytes();
System.out.println("开始处理 Markdown 文件");
// 提取图片路径
List<String> imagePaths = fileImageUtils.extractImagePathsFromMD(fileBytes);
System.out.println("提取的图片路径:" + imagePaths);

// 保存文件记录到数据库
File newFile = new File();
newFile.setFolderId(folderId);
newFile.setUserId(userId);
newFile.setName(name);
newFile.setFileType(fileType.getType());
newFile.setCreateUser(userId);
newFile.setUpdateUser(userId);
this.save(newFile);

// 获取文件ID
Integer fileId = newFile.getId();

// 保存图片路径到数据库并更新图片路径映射
Map<String, String> imagePathMap = new HashMap<>();
for (String imagePath : imagePaths) {
byte[] imageBytes = readImage(imagePath);
String serverPath = fileUtils.saveImage(imageBytes, fileId);
System.out.println("serverPath: " + serverPath);
iImagepathsService.saveImageDate(fileId, serverPath);
imagePathMap.put(imagePath, serverPath);
}

// 更新Markdown内容并保存
System.out.println("fileBytes: " + fileBytes);
System.out.println(imagePathMap);
String updatedContent = fileImageUtils.replacePathsInMD(fileBytes, imagePathMap);
System.out.println("updatedContent: " +updatedContent);
relativePath = fileUtils.saveMarkdownFile(updatedContent, fileType, folderId);
newFile.setPath(relativePath);
this.updateById(newFile); // 更新文件路径
System.out.println("Markdown 文件处理完成,路径:" + relativePath);
} else {
relativePath = fileUtils.saveFile(file, fileType, folderId);
System.out.println("普通文件保存完成,路径:" + relativePath);

// 保存文件记录到数据库
File newFile = new File();
newFile.setFolderId(folderId);
newFile.setUserId(userId);
newFile.setName(name);
newFile.setPath(relativePath);
newFile.setFileType(fileType.getType());
newFile.setCreateUser(userId);
newFile.setUpdateUser(userId);
this.save(newFile);
System.out.println("文件信息保存到数据库,路径:" + relativePath);
}
} catch (IOException e) {
e.printStackTrace();
throw new CommonException(ErrorCode.SYSTEM_ERROR, "处理文件失败");
}

return relativePath;
}
}

定时清理isDelete为1的字段(不确定是否可行)

在启动类上加注解:@EnableScheduling // 定时清理idDelete为1的用户

创建一个config类

package com.happlay.ks.config;

import com.happlay.ks.service.IUserService;
import org.springframework.scheduling.annotation.Scheduled;
import org.springframework.stereotype.Component;

import javax.annotation.Resource;

@Component
public class UserCleanupTask {

@Resource
IUserService iUserService;

// 定时清理
@Scheduled(cron = "0 0 2 * * ?")
public void cleanDeletedUsers() {
iUserService.cleanDeletedUsers();
}
}

@Scheduled(cron = "0 0 2 * * ?") 是 Spring 框架中用于配置定时任务的方法之一。这个注解用于在特定的时间点运行指定的方法。cron 属性接受一个 Cron 表达式来定义任务的执行时间。

Cron 表达式详解

Cron 表达式由七个字段组成,但 Spring 只使用前六个字段:

  1. 秒 (Seconds): 0 - 59
  2. 分 (Minutes): 0 - 59
  3. 小时 (Hours): 0 - 23
  4. 日期 (Day of Month): 1 - 31
  5. 月份 (Month): 1 - 12 或者 JAN - DEC
  6. 星期 (Day of Week): 0 - 7 (0 和 7 都表示星期日) 或者 SUN - SAT
  7. 年 (Year)(可选): 留空或者填 1970 - 2099

Cron 表达式的每个字段可以有多种格式,例如单个数值、用逗号分隔的列表、范围、步进值等。详细语法如下:

  • * 表示任意值。
  • ? 仅在日期和星期字段中使用,表示不指定具体值。
  • - 表示范围,例如 10-12 表示 10 到 12。
  • , 表示列表值,例如 MON,WED,FRI 表示星期一、三和五。
  • / 表示步进值,例如 5/15 表示从第 5 秒开始每 15 秒执行一次。
  • L 表示最后,例如 L 在日期字段中表示月的最后一天,在星期字段中表示星期六。
  • W 表示工作日(周一到周五),例如 15W 表示离 15 号最近的工作日。
  • # 表示每月的第几个星期几,例如 2#3 表示每月的第三个星期二。

示例解析

@Scheduled(cron = "0 0 2 * * ?") 这个表达式可以分解如下:

  • 0 :秒,表示任务将在第 0 秒执行。
  • 0 :分,表示任务将在第 0 分钟执行。
  • 2 :小时,表示任务将在凌晨 2 点执行。
  • * :日期,表示任务将在每个月的任意一天执行。
  • * :月份,表示任务将在每个月执行。
  • ? :星期,表示不指定具体的星期几。

因此,@Scheduled(cron = "0 0 2 * * ?") 表示任务将每天凌晨 2 点执行一次。

在service层、serviceImpl层中

void cleanDeletedUsers();
----------------------------------------
@Override
public void cleanDeletedUsers() {
// 查找isDelete为1的用户
LambdaQueryWrapper<User> queryWrapper = new LambdaQueryWrapper<>();
queryWrapper.eq(User::getIsDelete, 1);
this.remove(queryWrapper);

}